Relative Positions of ArUco Markers
Hello everyone! While working on my graduation project, I realized there is not enough documentation for ArUco and relative position/rotation calculations. I won’t focus on math, but you can check out the functions I’ve been using.
Before starting, I highly recommend that you complete camera calibration and have some knowledge about ArUco tracking. If you nailed these subjects, we are good to go!
In ArUco tracking blog, I’ve mentioned that we use estimatePoseSingleMarkers function to receive 3D translation(position) and rotation vectors of the detected markers. These vectors are marker centered and if we want to calculate the difference we need to calculate the camera centered vectors for each marker.
Let’s assume we calculated two markers 3D location. It means we have two vectors, let’s call them A and B vectors. Since their positions are calculated as camera centered, the difference between them will give us marker A as B centered or vice versa, since it’s dependent on the operation(A-B or B-A).

As you can see above, there are two markers in front of the camera. Markers are A and B, the camera is C. ArUco functions provide us AC and BC vectors, we require AB vector and the calculation is:
AB = AC - BCBut how we can do that? There is an angle issue between them, we can’t simply extract them. We need to invert the BC and use the sum. Here’s the function to invert the perspective.
Rodrigues angles are required to convert our rotation vector to the matrix form. Rodrigues angles can be used as 3x3 matrix or 3x1 vector. We are using the vector because of the matrix multiplication. It is required that the number of columns of the 1st matrix must equal the number of rows of the 2nd matrix. I won’t go further explanation of marker transpose and inverted angles, you can read some OpenCV docs for that.
If there are no questions, the current situation is:
AB = AC + (-BC)Now we have AC and (-BC) vectors. The only thing we need to do is summing the vectors. It will be easier if we use composeRT function from OpenCV. This function is combining two vectors. Let’s create our relativePosition function to do that. I didn’t check the vector sizes, so it would be helpful if you consider some assertions.
What we accomplished in this function:
- Reshaped the vectors to 3x1 for passing OpenCV assertions.
- The inversion of the second marker is calculated.
- Combining the first marker and inverted second marker. For readability, I created the info variable, totally unnecessary but if you want to catch the errors and some useful info you can change the code a little bit and make it better.
- For future usage, we reshaped the result to a 3x1 matrix.
Functions are done. Now let’s check the demo, shall we? You can find the whole code below, there are some parts that I mentioned in my earlier posts[calibration, tracking], please check them first if there is something you don’t understand.
You should give the marker ids as a parameter, for the demo purposes. If you named it as “demo.py” the command you’ll use:
python demo.py --coefficients 0 --firstMarker 12 --secondMarker 34Arguments:
- coefficients: If zero, the camera is not calibrated. If one, provide the path in the code. Not a good practice, but happened.
- firstMarker: ID of the first ArUco marker.
- secondMarker: Id of the second ArUco Marker.
How demo works:
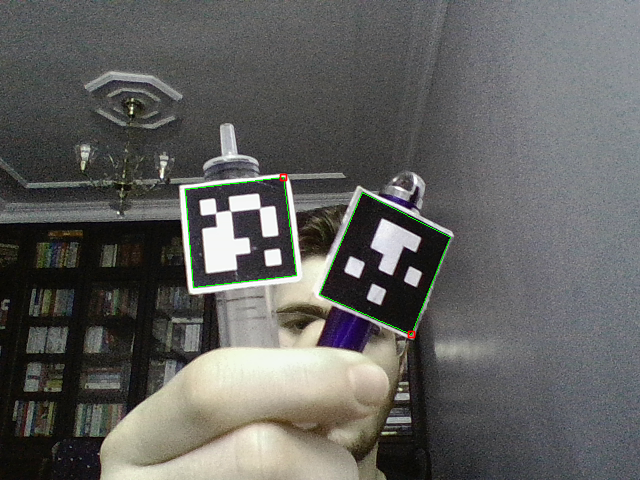
- It is a realtime video stream. If you show the markers you gave as arguments you’ll see something like this:
- If you press “c”, the relative position will be calculated. It’s the calibration between the markers. The relative position will be calculated. If we do it in every single frame, you won’t see any difference because it’s gonna be like the normal marker tracking. In the stream it will be like:

- If you pressed “c”, you have the perspective transform between two markers. By moving the second marker, you’ll see that the distance and rotation between the markers will stay the same because the calibration is not changing for the demo purpose. If you want, do it in each frame and you will have full control and you can achieve anything you want. But if you leave it like that and assume that there is an a angle and xyz difference, you’ll see that wherever you move the second marker, there will be an axis image rotated by a angle and moved by xyz-(xyz2). If you have a 3D object and you watch the edges, for example, you can see if the object is broken or not because if it brakes the markers will be effected. Or maybe you are putting markers in front of each room and corridor and guiding people in the building. These are some examples of how we can use this knowledge. So, after this step your result will be like:

Most of the code is present in my early blogs. I added some comments and put them to a GitHub repository. It would be awesome if you visit and like it, every star counts! If you want to experience the whole process, please rewrite the code and compare with mine. It is tested in my own graduation project, you can count on the results.
My project was that with one-time calibration, following the ultrasound info and the needle. By doing that, even if the needle is inside the body I can see the marker attached to that and see through the body. It reduces the risk of needle went somewhere wrong because of inexperienced doctors and possible errors in the environment. But of course, because of the light in the environment, mathematical errors, light level changes, camera calibration, etc. there will be errors. For these reasons, I suggest the Kalman filter.
By reading the blog and working the code, I can say that you now know the fundamentals of using ArUco markers. From there, you can use your imagination and practice a little bit to achieve further. You can check some showcases and applications to replicate them or make them better. I hope this blog will guide you on your project. Have a great day!
Resources:
